How to access and use the Symbiant API – This is a standard REST Application Programmable Interface – You will need to contact us to get authorization for your server (IP) to access your data.
Prerequisites #
- A user account with API-enabled Role (If you do not have an API role-enabled user account, please submit a support ticket!)
- An EDN (Extensible Data Notation) Parser (Java, JavaScript, Ruby, Python)
- Transit Encoder/Decoder (Java, JavaScript, Ruby, Python)
Please note 3rd third-party developers provide the above packages, Symbiant is not responsible for, nor can we guarantee their suitability for their intended purpose, the use of 3rd party code is done so entirely at your own risk.
Authentication #
API requests are made against a specific user, this can be any user with a registered account and an API-enabled role.
Please be aware that the API will restrict the information you can send/receive in the same way the client application does, so it is important to ensure your user has enough privileges to perform the tasks required.
API Access Token #
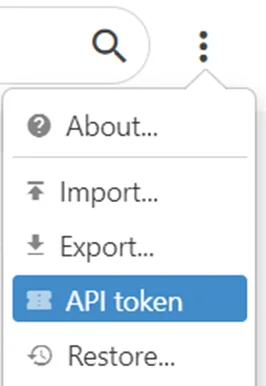
A secure token is required to authenticate access to the API. To retrieve this token, log in as the API-enabled user, select the three dots from the top-right menu, and then select “API Token”.
These tokens will expire after a set amount of time if a Refresh call hasn’t been made, therefore the step above will need to be repeated to obtain a new API Token if it has already expired.
If you do not see this option, please confirm the user has API privileges.
After selecting “API token” a file will be downloaded containing all the necessary information to access the API, it will resemble the image below.
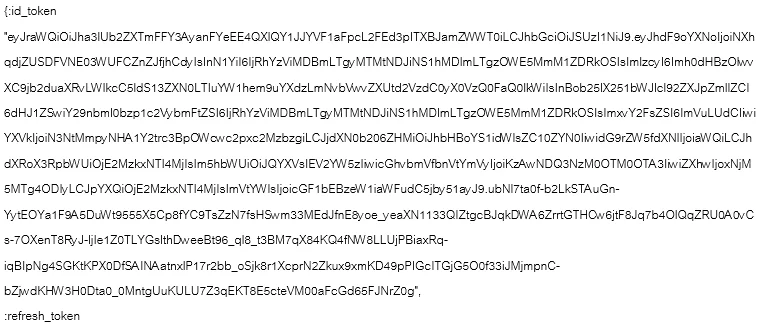
This file will contain the “API Token”, the “Refresh Token” and the “API URL”.
Making API Requests #
The Symbiant API adheres to most of the REST API standards, requests to get data are made with GET.
Creating data with POST, updating data with PATCH, and deleting with DELETE.
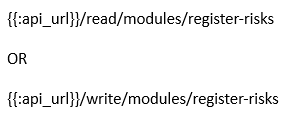
However, it is important to note that the URL resource is also prefixed in the Symbiant API with /read/ when getting data and /write/ when writing data.
GET #
Below is a template example of how to run a GET request.

Note: Please replace the {{:__}} with your specific information as applicable.
GET Example #
In the below example, this would return a Register Risk resource with the reference [id] 108.

Note: This is using “acme” as an example API URL, the actual URL you would use wouldn’t be “acme”. (The API URL will be inside the API file as downloaded from the System).
Data Returning: #
The returned data is Transit encoded EDN. In the first step, we provided links to EDN and Transit libraries for a few of the more prominent programming languages. If the language you are using is not there a quick Google search may provide you with a suitable library, otherwise, you will need to implement your own based on the specifications again these can be found with a quick Google search.
All attributes are name-spaced keywords, in EDN these look like :some/attribute, e.g. :risk/reference.
GET Filters #
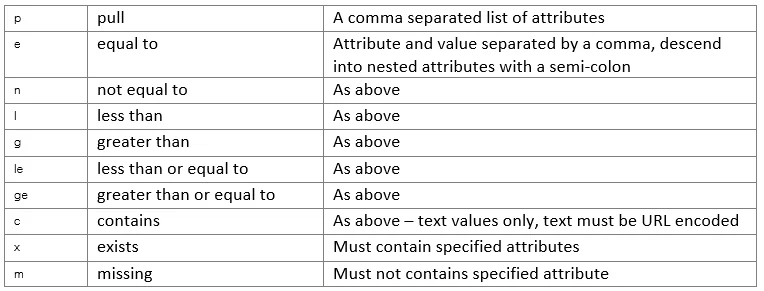
GET provides a few simple filters to help refine the data that is returned. These filters are shown below.
GET /help/ #
To help you work with the API you can execute an API request to GET /help/
This will return details about the attributes available and the structure of the data, again it will be Transit encoded EDN.
Calling GET with the /help/read/ prefix, with or without an ID will return the GET graph,
Calling with the /help/write/ prefix without an ID will return the POST graph, and with an ID the PATCH graph.
The data graphs will also include details about attributes, whether they are required, collections, what the primary keys are etc.

To understand what resources are available you can either call GET /help or infer them from the client application.
For example, in the client application, if you look at the URL when accessing Register Risks, you will see a URL like the below image.
![]()
Note: The prefix of “app” may be different to your client application, as you may be on your unique domain.
This would translate to an API resource of the below.
POST #
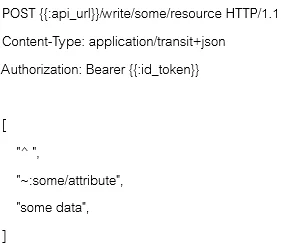
The primary key (first attribute in the data graph) is always required, all other attributes are optional unless specified as required or identified by calling GET /help/write/… , see GET /help/ for more information.
It is important to remember that the data submitted must be in EDN format and encoded with Transit.
PATCH #
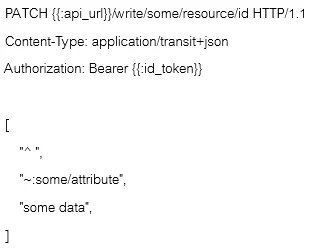
As with POST, the request body must be in EDN format and encoded with Transit. The body must always contain the primary key attribute, e.g. :risk/reference, otherwise only include the attributes you want to change.
Do not include attributes you are not changing as this will skew your audit trails.
Removing Values #
To remove [retract] values, supply these to :tx/retract.
![]()
DELETE #
CAUTION: Issuing this request will immediately delete the specified resource.

Refreshing API Access Token #
The API :id_token will expire after :expires_in (default is 36,000 seconds).
To avoid having to login again and download a new API token, you can use the :refresh_token to get a new :id_token.
This action must be performed before the current token times out, i.e., within 36,000 seconds of logging in as the API-enabled user.
The format for refreshing the API token is shown above.
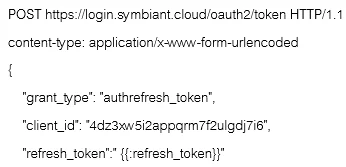
This will return a new id_token and refresh_token, please be aware that the format of this response will differ from the format of the original API token, it will also not include the URLs or :client_id so these must be taken from the original API token.
Testing the Symbiant API (Postman) #
To test the Symbiant API, you can use any 3rd party API testing software such as Postman API Platform.
This will allow you to ensure that you can connect to the API without any issues.
Note: Postman doesn’t support EDN/Transit Encoding/Decoding natively, therefore this is only usable to test connectivity.
Using Postman #
To test the connectivity with the Symbiant API, please ensure you have a valid API token from an authenticated API-enabled Roled User in the Symbiant Client Application.
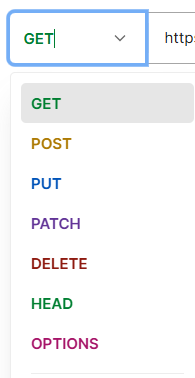
- Set Postman to a “GET” request.
- Select the “Headers” from the top menu

- Add an “Origin” key. The value for the “Origin” will be your Symbiant Client Application URL (Example: http://app.symbiant.cloud).
- Your client application could have a different prefix instead of “app” if your client application is on a unique domain.

- Your client application could have a different prefix instead of “app” if your client application is on a unique domain.
- Add a “Content-Type” key. The value will be “application/transit+json”.

- Select the “Authorization” header from the top menu

- On the “Auth Type” select “Bearer Token”.

- Enter the “:id_token” from the API File you downloaded from Symbiant
- Note: Please ensure you only place in the API :id_Token, not the entire file, and not the Refresh Token alongside the Authentication Token
- In the below image that would be from the opening “eyJaw to the JNrZ0g” (Without the Speach Marks)


- Enter an API Endpoint you want to access.

- An example Endpoint would be: https://{{:api_url}}.execute-api.eu-west-2.amazonaws.com/dev/read/modules/register-risks/1
- Note: Replace {{:api_url}} with your API URL found inside the API Token File.
- This will access the “Register Risks” Module, and read from Record Reference 1.
- If you wish to use other Modules, please find their respective “Name” from the Client Application. (I.e. Controls = modules/controls, Audit Tracker = modules/issues)
- Note: Replace {{:api_url}} with your API URL found inside the API Token File.
- Select the “Send” button on the left of the API URL bar.
- A status code “200 OK” should be shown alongside a response body of data signifying a valid connection.


